Git and version control
Overview
Have you ever accidentally deleted work on your computer and realized you needed it and lost work? And you were left with the terrible feeling you had to do it all again? Or had to make tedious revisions to merge work done on the same document with others? Git and Github fix all that.
The practice of data science involves a lot of data, code, figures, tables, manuscripts, and other documents. Many of these files evolve during the course of a project and often need to be shared with collaborators. Projects can easily spiral out of control (reducing the quality and reproducibility of your work. The good news is that this can be mitigated by using version control.
A popular way to use version control is with Git and Github.
-
Git is software that usually is installed locally on your computer that is essentially a system which keeps track of documents and changes.
-
Github is an online platform that implements Git to store and manage your files, and also is very conventient to share and showcase your work to others. Git and github make it easy to store and share your work, but they are also a great way to build a portfolio of your work. These tools are extremely useful when you start to build and work with data science projects that have, say, more than a handfull of different code and data files!
-
Github Desktop is a piece of software that allows you to interface with Github with a Graphical User Interface (GUI), as apposed to working with Git and Github through the command line exclusively with code).
NB there are many different software solutions out there to use Git and Git-like systems, but for our purposes we are going to keep it simple and use Git with Github and Github Desktop. The examples for this page or presented for Windows 10. The intructions are identical for Macs (except you will need to download the appropriate version of Github desktop for your own OS). If you happen to be using Linux, you might try Gitkraken instead as a github GUI application. Getting Git up and running can fiddley, so as with any of the modules in this bootcamp, if you have any problems join us in the Slack channel for help.
Note about “freedom”, “open” and “open source”
“Free software” is a philosophical idea: FREE means no cost (like free beer), but more importantly it means free as in liberty to use, improve, and share.
You may have come across the idea of “open source” software. This concept was developed on the premise that source code for software could and SHOULD be made available to anyone all the time. That way, bugs could be found quickly and fixed, functionality could be added by a large community, and all fixes and upgrades could be immediately available to everyone. These somewhat socialist ideals were initially criticized by traditional “closed” software companies, but actually there has been immense economic successes for open source software (Android, Linux, Google Chrome, Firefox, R (of course), and many others). If you are interested in learning more, you can read a little about it via the Free Software Foundation.
An important separate point here is that a lot of people believe that science, both scientific research methods and literature, should be reproducible and open too. Without digressing further on this subject, you can read more about it if you wish:
Contents
3.3.2 Make a first “repository”
3.3.3 Making changes to the repo
3.3.1 Set up Github and Git
Okay, we need to do a few things here before we can start:
1 Create a Github account (assuming you do not already have one)
2 Install Github Desktop
3 Sign in to Github with Github Desktop
Let’s go!
1 Create a Github account
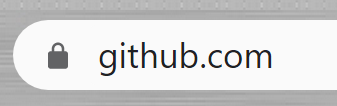
This is straightforward; navigate to github.com.
Hit the Sign Up button.

Create a free account. You will need an email address (any will do).
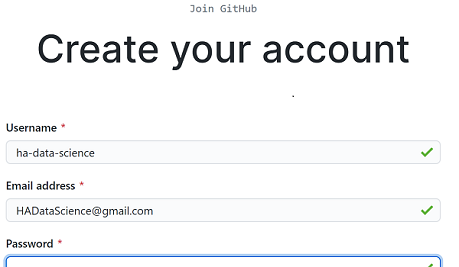
You may need to log in and verify your email at this point.
2 Install Github Desktop
Navigate to the Github Desktop webpage and download the version that suits your operating system. NB you do not actually need to have a github GUI program; here we are starting with one simply because it is fast to begin this way for people without a lot of coding experience (and you can always learn to use the command line interface later).

3 Sign in to Github with Github Desktop
This step is used to link Githug Desktop with your cloud space on Github. Go ahead and sign in to github.com with the account information you just created. In this way, Github Desktop will save your credentials and make it work seamlessly between your local machine and the Github.
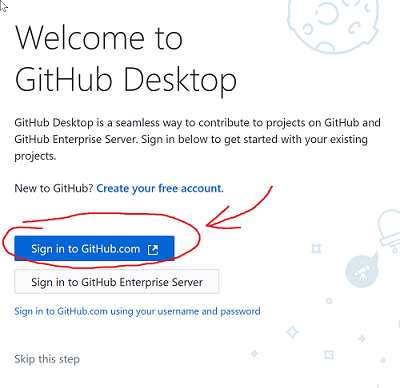
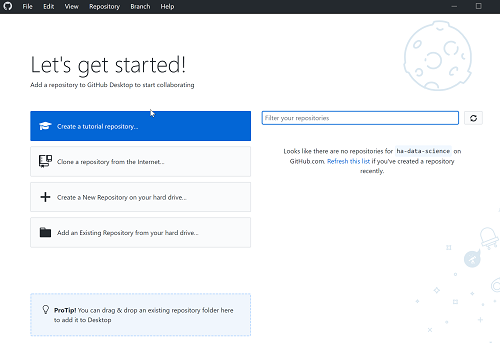
After logging in you should see something like this (success!):
3.3.2 Make a first “repository”
A repository, or repo is basically Git jargon for a folder on your computer that contains a collection of files and often other folders. This folder might be as simple in structure as a single script and dataset, or it might be very complex, say complex enough to make a whole piece of software, a large machine learning project, a website or even a book or scientific manuscript.
The idea is that Git “watches” the folder and any changes you make in your local repo are tracked (once this is set up, it just “happens” automatically), then every once in a while you update those changes to the version of your repo on Github. Of course, the system is reliable even if loads of people are making changes at the same time, adding parts, upgrading parts, correcting mistakes, etc. This is really the power of Github.
At this point it might be fun for you to just have a peek at some repositories. Here are a few we think are pretty cool:
-
Daniell Navarro’s free and open Learning Statistics with R book. That’s on Github.
-
Pytorch, one of the most powerful machine learning object detection tools. That’s on Github.
-
RGames - mini-computer games coded in R!. That’s on Github too.
Flash challenge: find a github repository you are interested in, read the ReadMe (most repos have a ReadMe file in the root folder that is rendered as an html webpage with information at the bottom of the Github landing page). Probably the easiest way to find github repos at this point would be to Google github + <words describing things you are interested in>.
There are a few ways of setting up a repository:
-
Start with an existing folder on your computer and make it a repository. There may or may not already be files in the folder, and if there are they may or may not be complete (probably not!), as in an ongoing project.
-
Create a new folder on your computer at the same time as you make it a repository. Here the plan it to build up the contents.
-
Copy (“clone” in Git jargon) an existing reposity from Github. Here the idea might be to learn from an existing repo, or to add functionality or content to it, or to directly collaborate. Because the content is free and open, you have liberty to do any of these things!
Make a repository
We are going to make a first repository with an existing directory located on your own computer. We will go through these steps:
1 Download a zip file containing a folder with some files in it, and unzip to a directory on your own computer
2 Add the folder to Github as a repository using Github Desktop
3 Check our your own site on Github.com and examine your new repository
Let’s go!
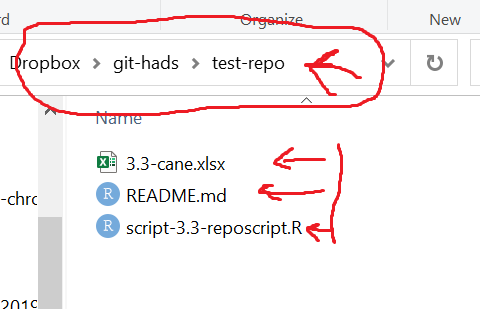
1 Download this zip file containing a folder with some files in it.
You can unzip this folder anywhere on your computer, but it might be a good idea to make a folder just for git repositories, and then unzip the folder into that folder.
Mine looks like this In the Windows Explorer file browser) and yours should look similar (note my directory path and note the directory name with 3 files in the test-repo directory:
2 Add the folder to Github as a repository
At the moment you have a folder with some files on the hard drive of your local computer, but that is the only place it exists. This will eventually become a repository, but at the moment Github does not “know about it” and neither does Github Desktop, i.e., it is just a folder.
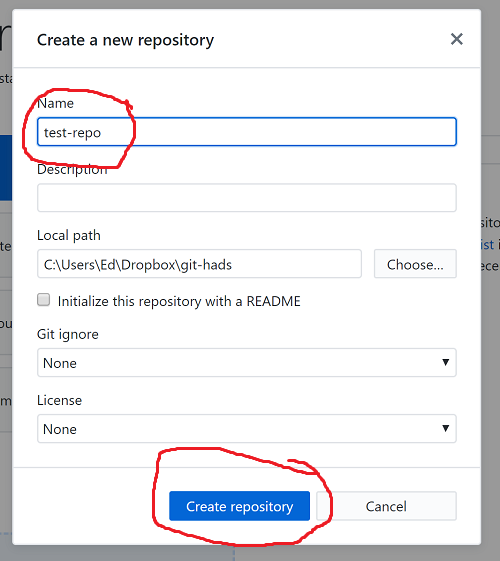
Back in Github Desktop, if you are still in the start page you can just hit the button “Create a New Repository on your hard drive…” (or use the menu File > New repository…)
You should see a screen similar to below, which you can fill in with similar details, like the Name field. For now, ignore the Git Ignore, and the License fields (although it will probably not hurt anything if you want to experiment). Hit the Create repository button:
After you hit Create repository, you should see a window like this:
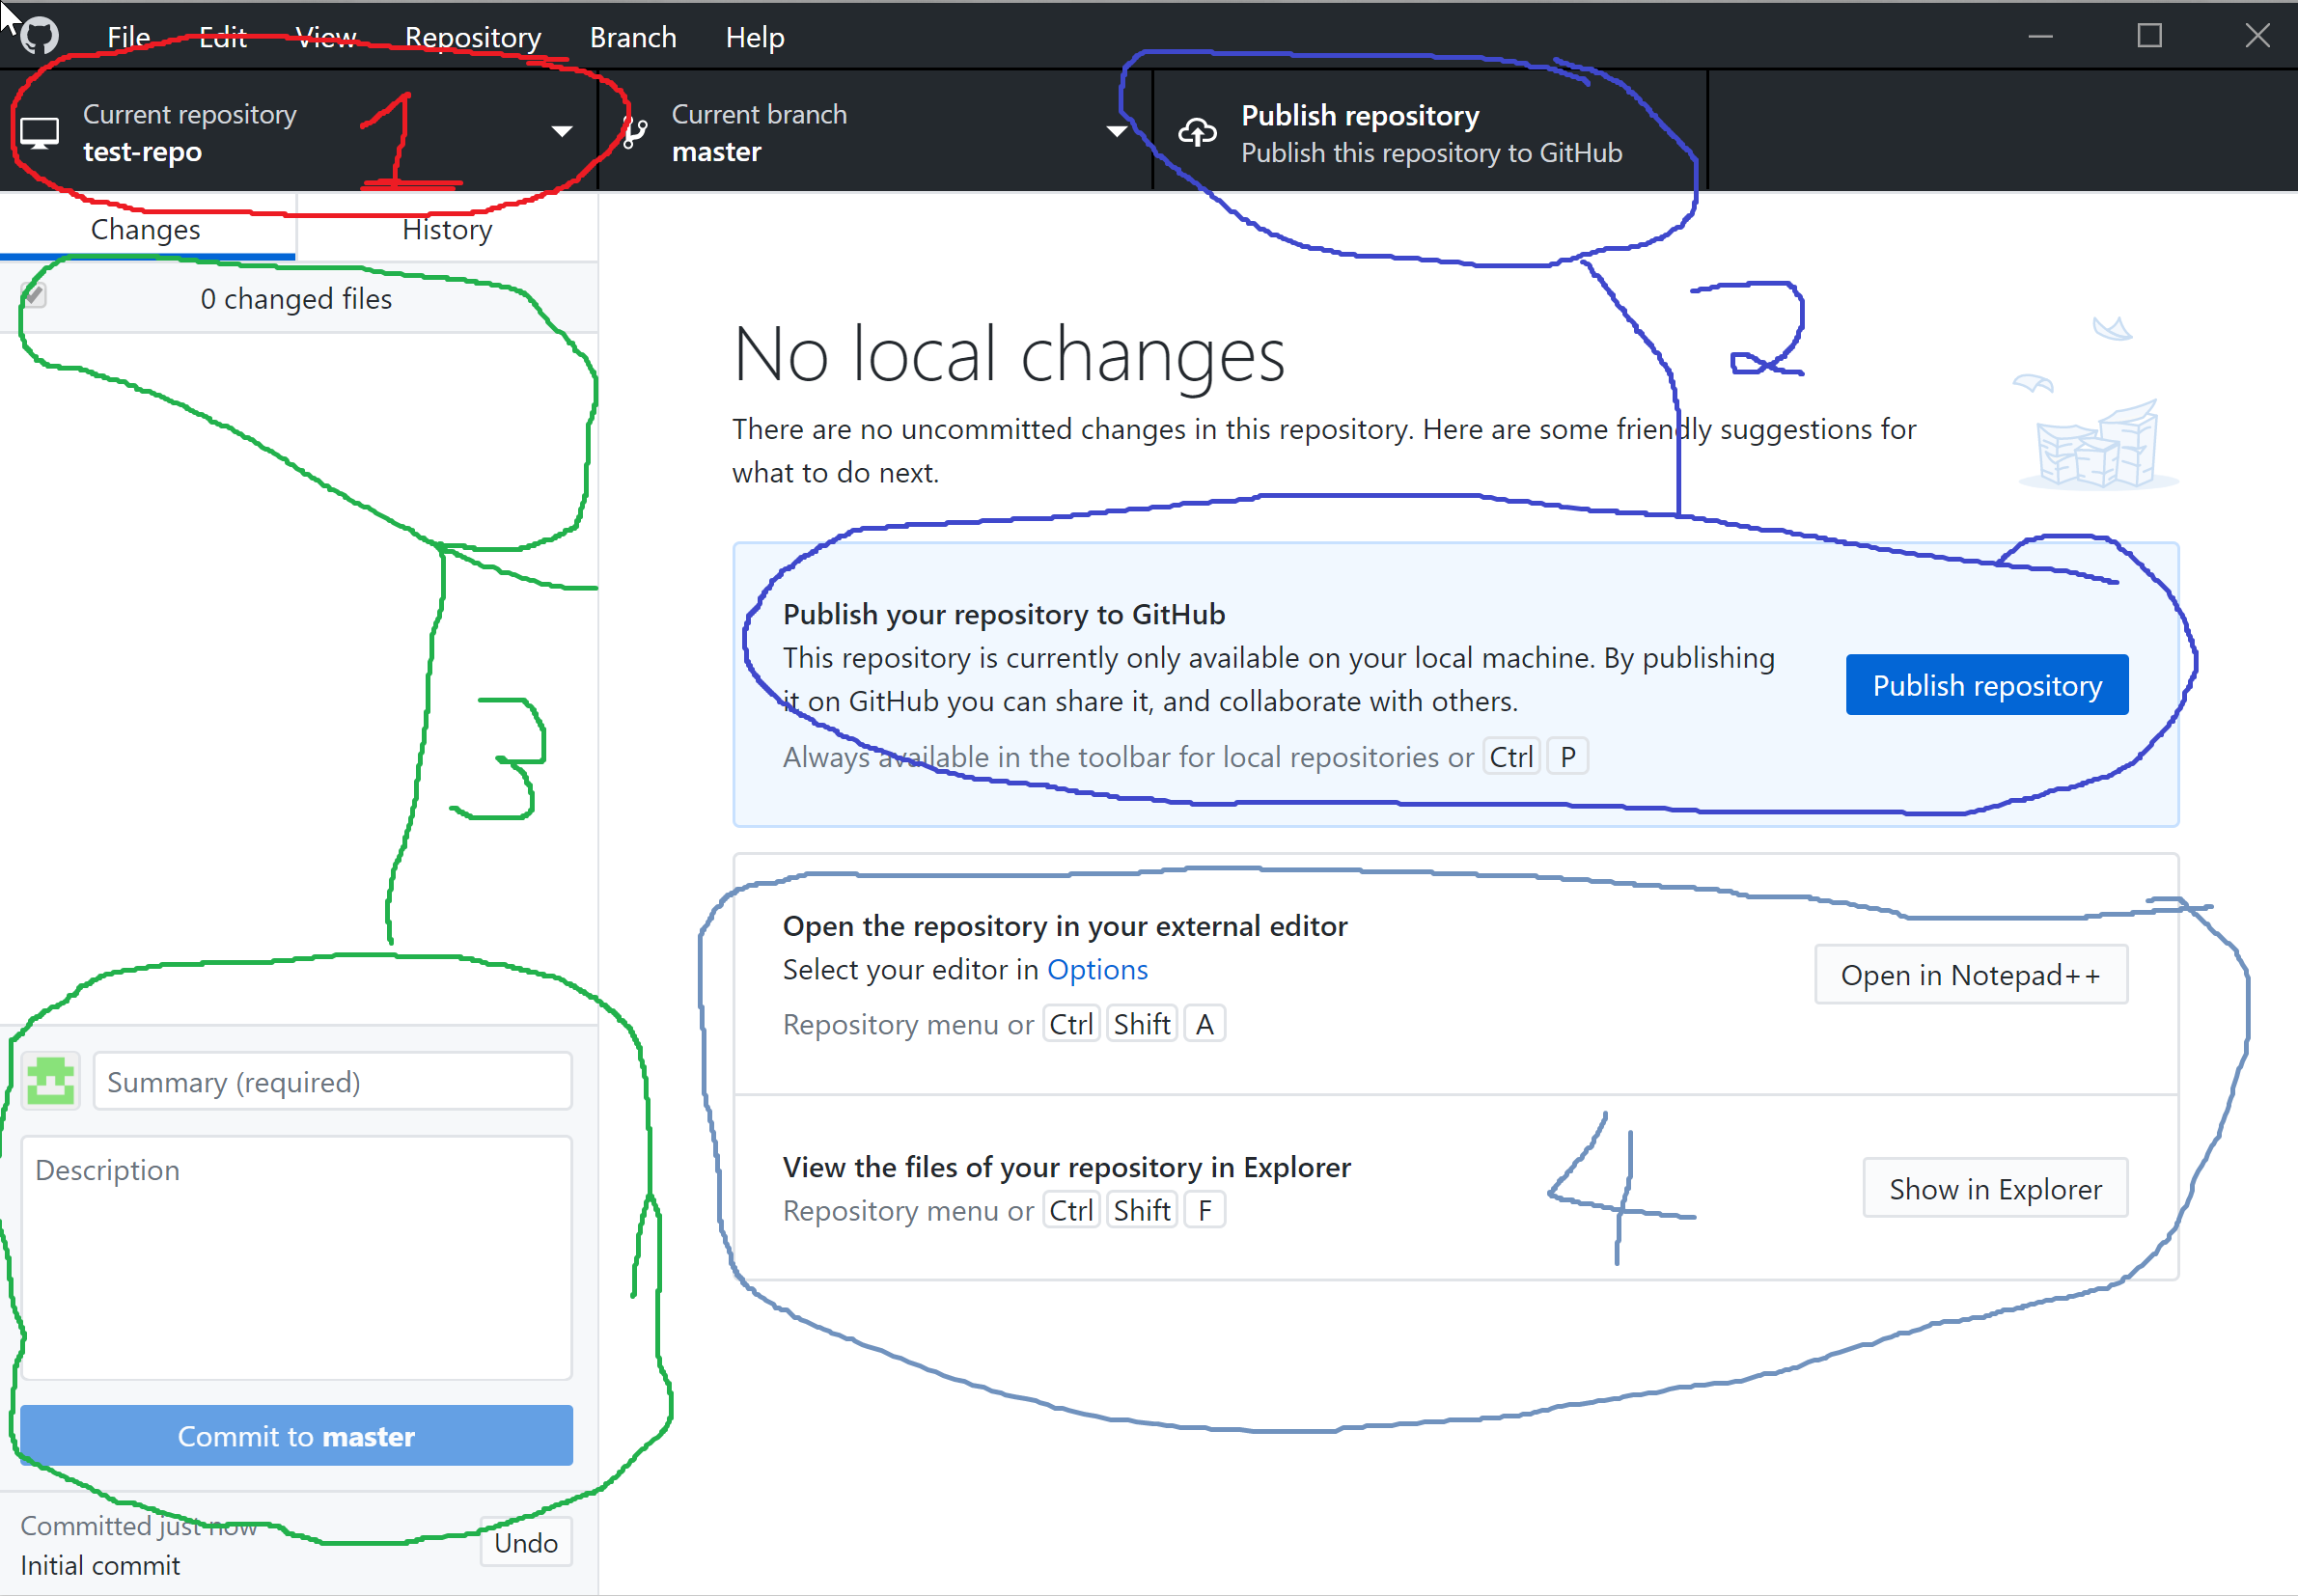
A the Current repository. When you have more than 1 repository, you can select which one you want to interact with here. If you chose the name test-repo, it should be listed here as the Current (active) repository.
B Publish repository. This option will show only when you have a local repository, but you have not linked it to Github yet (we will fix that shortly).
C Changes and Commit to Master. This area is where you manage changes in your repository. Assuming you have not opened and saved changes to the files in your repository yet, there should be listed 0 changed files. When there are changes you want to update to the “Master” repository (i.e., the most recent version of all the files), The summary field must be updated with a brief descripotion of the changes and the Commit to Master button will become available.
D Open and View files. These are utilities in Github Desktop that link files in a repository to software to vioew and manage files. For this repo we will not be useing those, but since it is an R script and an xlsx data file, we will be using Rstudio to view and edit the script (and README.md file too).
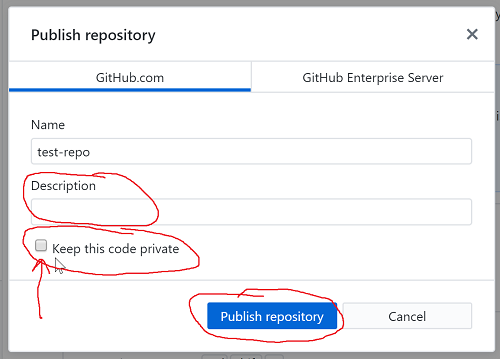
Now you have identified you folder as repository, and Github Desktop is now “watching it”, however it still does not exist on Github, because it has not been Published. Go ahead and hit one of the Publish repository buttons (it does not matter which one). You should see something similar to this:
-
Uncheck the Keep this code private box (this is handy if you are working on something top secret, but it does not apply here!)
-
Add a description if you wish
-
Hit the Publish repository button (yep, this is the second one…)
You may have noticed that the Github Destop GUI changes contextually as the status of your repository changes. Now you have a Fetch origin button along the top (this is in case there has been a change to your repository on Github, that has not been compared to the changes on your local hard drive where you are running Giuthub Desktop). You also should see something like this in the main pane:
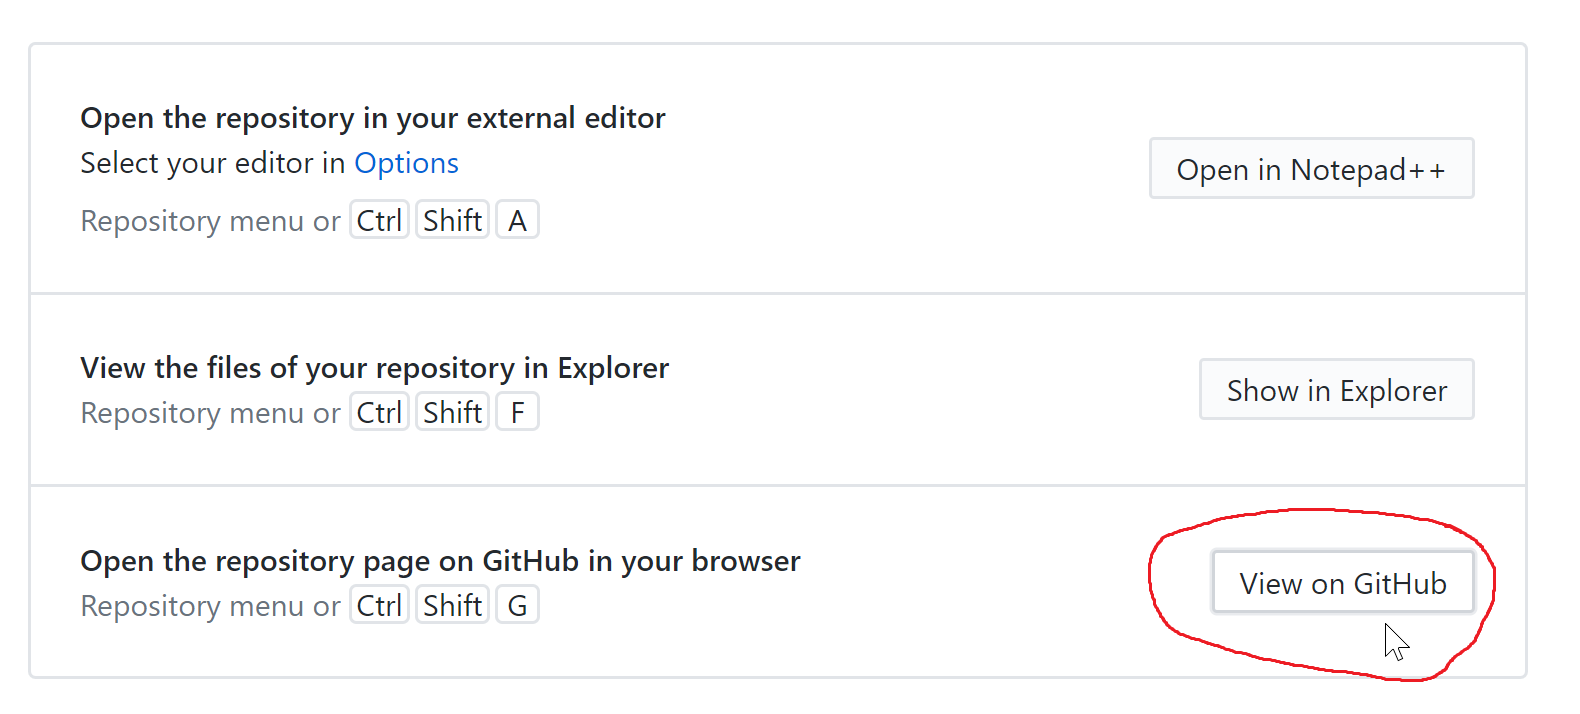
3 Check our your own site on Github.com
Go ahead and hit the View on Github button, which should launcha a brower to your Github page in the directory for this, your, first repository.
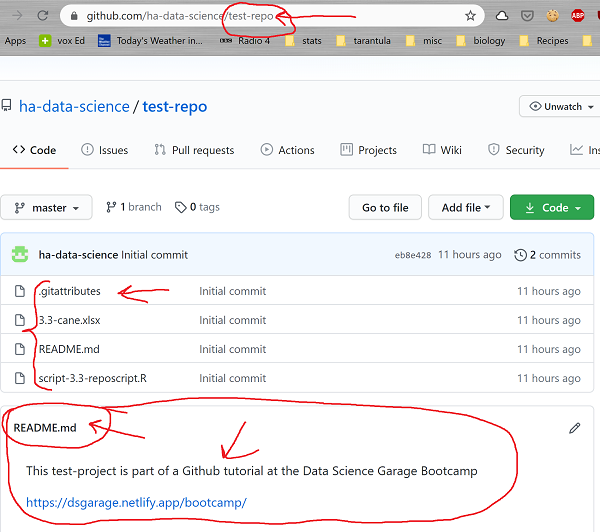
Notice a few things:
-
The URL for your repository is test to the name you chose for your repository. This is very useful for accessing the files either by code, or by direct download, or just for someone to visit your site.
-
The list of files is shown here - note there is a new file called .gitattributes which is part of the Git tracking system for changes to the repository. If you look in the local repository folder on your computer, you should also see it there
-
At the bottom of the page that the README.md file is rendered and displayed as an HTML document. There is not much content at the moment…
3.3.3 Making changes to the repo
We are going to make a few changes to the repository now:
1 Edit the local repo to change the R code to fix up the graph and make it “good” (TM)
2 Edit the local repo by changing the README.md to spruce it up a little
3 Update Github with the repo changes we have made on our local copy
1 Edit the local repo to change the R code
Navigate to the “local” repository folder on your own computer and go ahead and open both the R script file script-3.3-reposcript.R and the markdown script README.md in RStudio. The script is very short, but is set up with Header and Contents blocks. In the Setup section you should see something like the code below. Go ahead and edit the path character variable to be that of the path to the repository folder on your own computer, set your working directory, and read in the data.
## 01 Setup ####
# Get the data set up

# Set a path character variable here
mydir <- "D:/Dropbox/git/DSgarage/public/data" # << change to your repo dir!
setwd(mydir)

library(openxlsx)
data <- read.xlsx("3.3-cane.xlsx")
You will probably want to open the data file and look in the data dictionary tab to read about what the data are, where they came from etc. The data are compliant with the Tidy Data format in Excel, but the information is fairly terse. Basically this experiment was looking at disease in sugarcane and where disease susceptibility was examined in different sugarcane strains in a block design. We will look at this in a very simple way - just looking at the proportion of diseased plants relative to the total number for each strain.
Go ahead and run the code to make a plot just as it is:
## 02 Graph ####
# Make a plot showing the proportion of diseased stems per plot
# (variable "r" / variable "n")
# as a function of cane variety (variable "var")
plot(y = data$r/data$n,
     x = data$var)
You should see something like this:
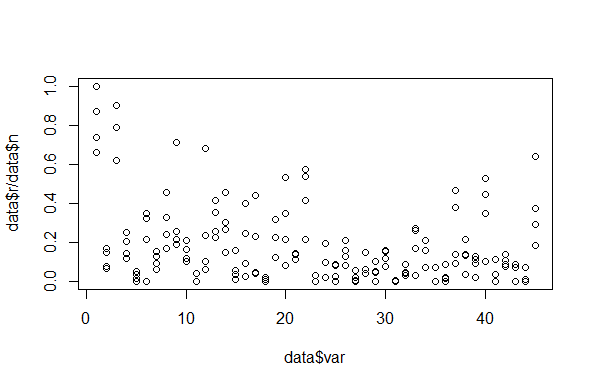
Let’s be honest - a bad graph can be worse than no graph. This graph is terrible (but probably not worse than no graph). Let’s critique it.
-
The axis labels are not really good enough
-
It is hard to see the individual data points for individual cane variety
-
It is a bit “ugly” in general…
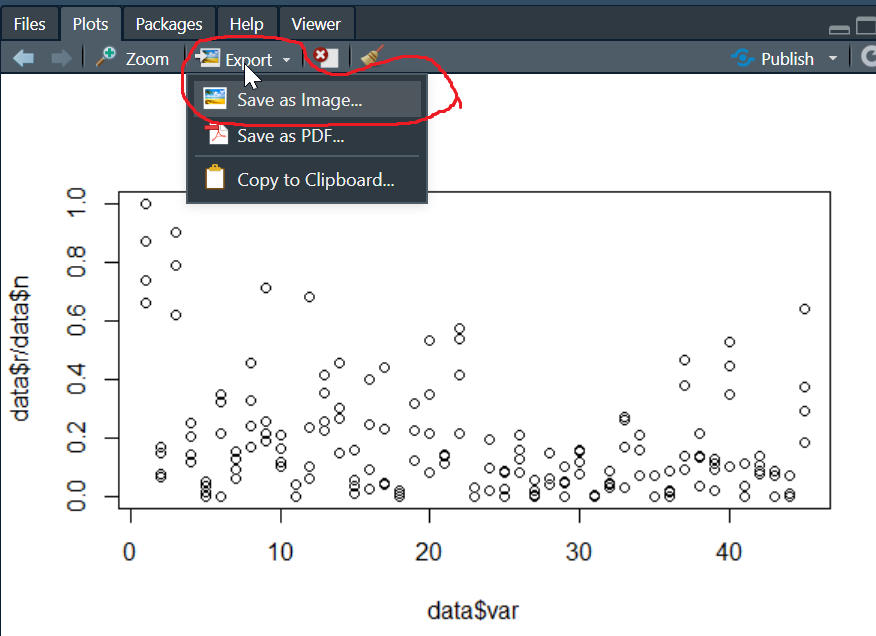
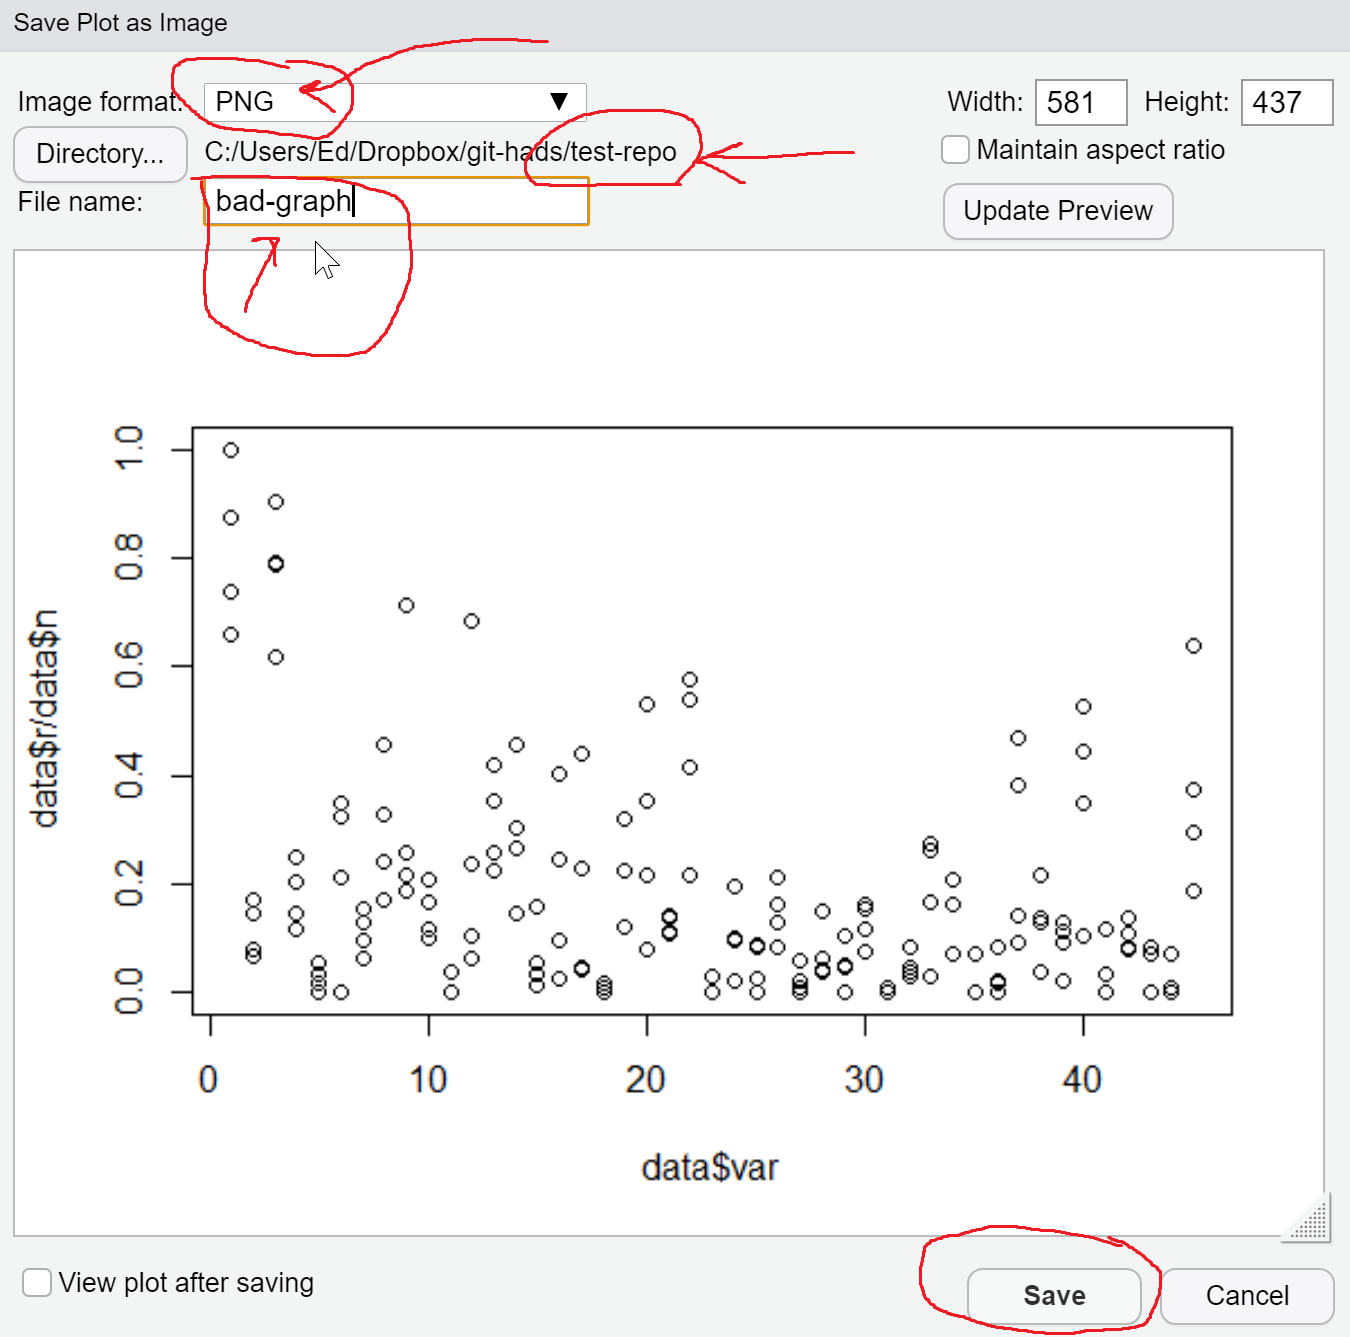
Go ahead and save a copy of this bad graph to your working directory (i.e. save it to your repo directory). Do this with the Export button in the graph menu in RStudio and choose save as image. Name the image file bad-graph.png if you want to follow along exactly. Note the default Image format is .PNG (a good format for web pictures), and the Directory for saving the graph is your repo directory. Go ahead and hit Save.
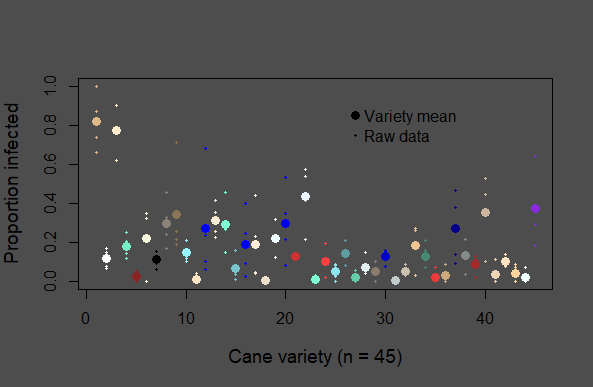
Your task here is to make the graph better - you can do this in any way you wish. Go ahead and make your changes to the script to make a great graph. When you have finished, save your R script changes in Rstudio, and save a second version of the graph called good-graph.png. Go ahead and make any edit you want, but try to make it obviously different (and better) than the bad graph. With mine, I wanted to specifically be able to see the raw data for each cane varity better, which I made a unique color for. I also added a bigger dot for each variety that is the mean. Finally, I changed the background colour for the base plot, and I added a legend for the meaning of the different sized dots - mine looks like this:
Flash Challenge: make your graph look as close to mine as you can!. Once you are happy, save your new image as good-graph.pgn and go ahead and save your R script too.
2 Edit the local repo by changing the README.md
Go ahead and look at the README.md file now, obviously a Markdown file (there is a visual que for this in the RStudio tab icon for the file). This is a very minimal README file. For bigger projects, the README might serve the function of providing information to potential users about the resources in repository, or it might even act as a minimal website. Like a lot of script-type files in different computing languages, the files is really just a text file that, due to the file extension (the .md part) is recognized and displayed with syntax highlighting appropriate to Markdown in code editing software like RStudio.
Here you are going simply add some text and display both of you graphs to the README file to display in your repository directory in Github. Edit your README.md file contents to be something similar to below. By all means, you should experiment here and play a little with the Markdown language, but the point here really is to demonstrate the basic usage of Github Desktop.
## My test reposity
This test-project is part of a Github tutorial at the Data Science Garage Bootcamp
https://dsgarage.netlify.app/bootcamp/
## Bad graph
### bad graph R code
plot(y = data$r/data$n,
x = data$var)

### Better graph R code
(Put your code here!)

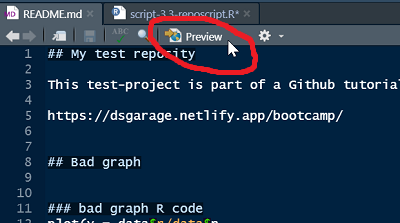
You can see what your page will look like right inside RStudio, by hitting the Preview button. When you are happy make sure and save your changes to the README.md file.
3 Update Github with the repo changes we have made on our local copy
Now it is time to look back at Github Desktop. What you should see, all being well, is that the main page now has a lot of content detailing the changes made to your repo directory. If you have followed along, you will have edited the R script, the README file, and added 2 picture files (also, if you have hit the preview button in RStudio, there will probably also be a README html file that was created by RStudio). It should look similar to this:
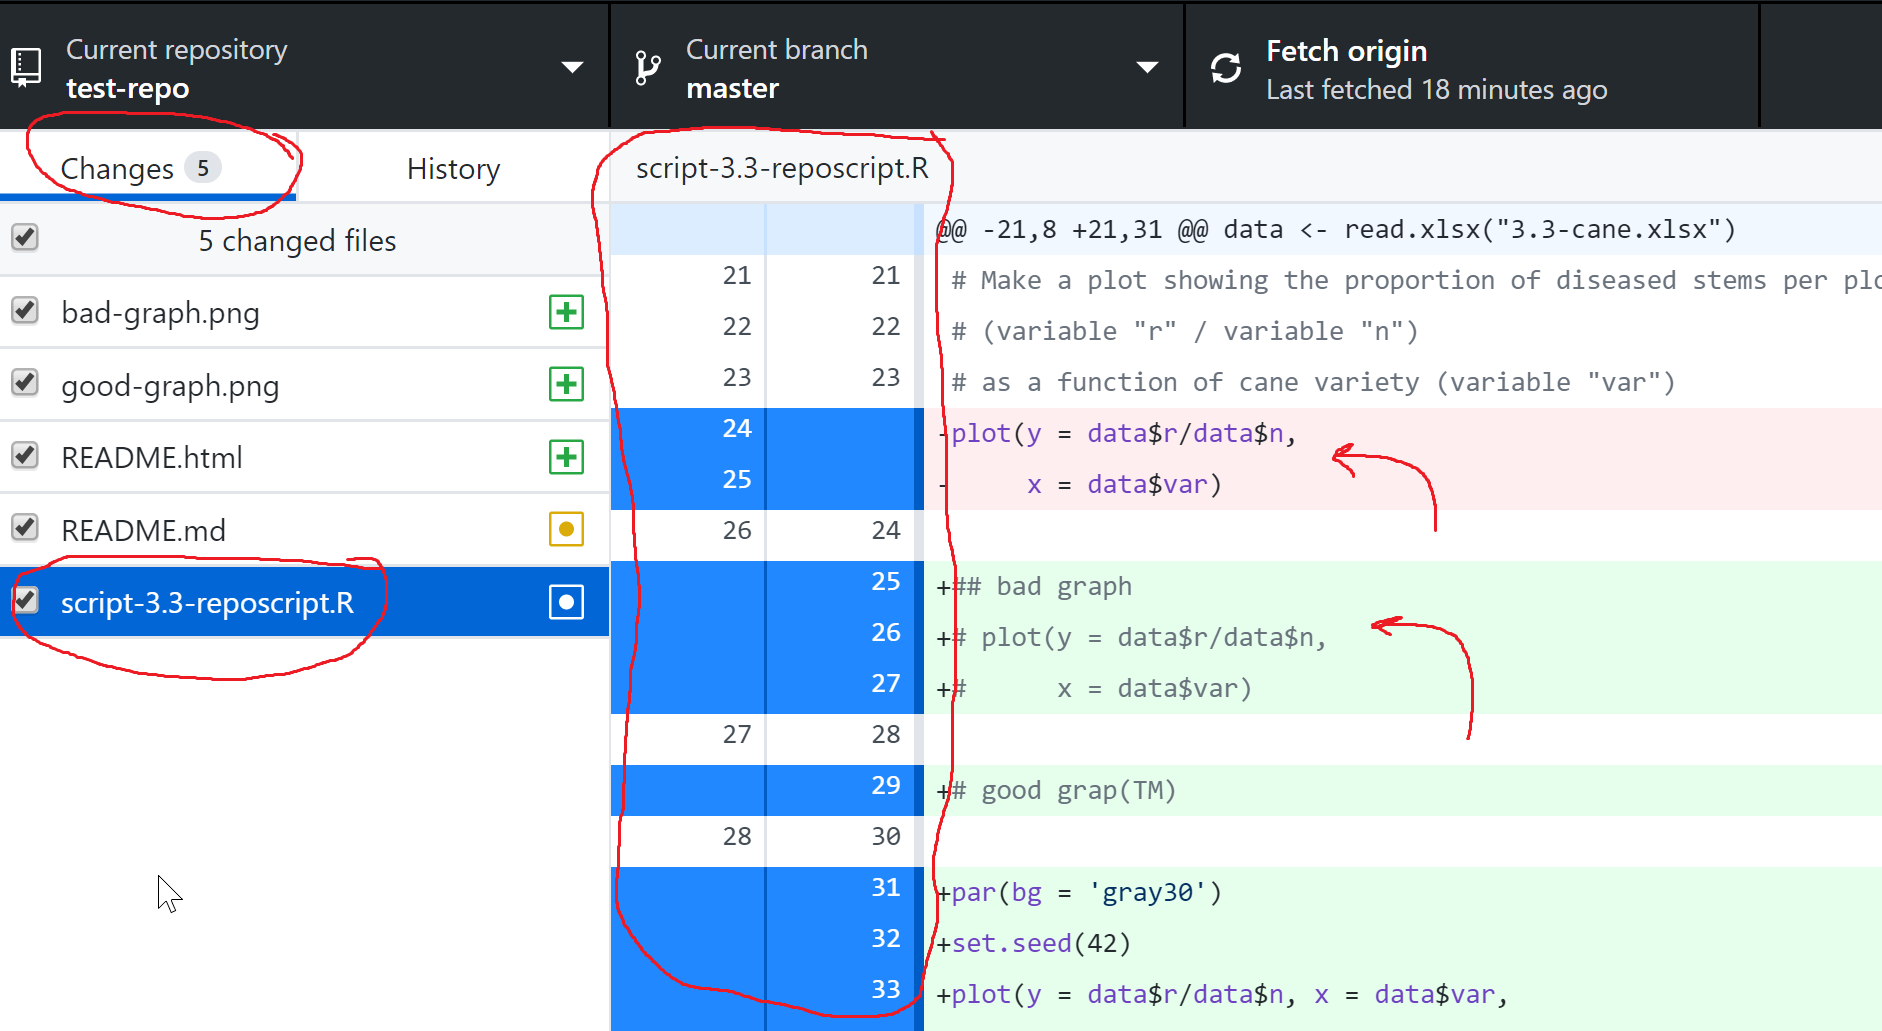
Note a few things here:
-
The Changes log is shown in the upper left (there have been 5 files changed in mine)
-
Click on individual file names to see the changes. If you try to click on the different file names, you should see the changes rendered in different ways depending on the file type. E.g., the picture files should be rendered and displayed, the content of code files should also be displayed.
-
Code file changes are detailed. The line numbers where changes have happened are shown. Deletions are highlighted in red; additions are highlighted in green.
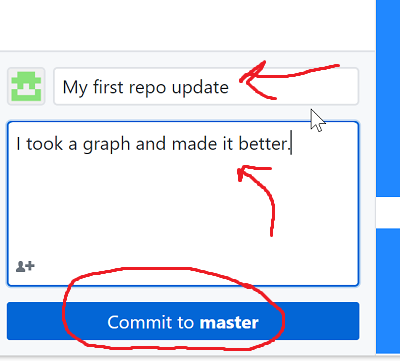
Next step: Commit to Master. When you “commit” a set of changes in your repo, it is kind of like making a stopping point for a set of changes to all files in the repo (specifically ones that have happened since the most recent commit). To do this, you must document a summary of the commit and optionally you can write a brief description of the changes. Once you supply a summary, the Commit to master button becomes available like in the picture below - go ahead and hit it.
Now the status of your repo has changed. In your repo, you have made a commit to Master and there are no local changes since the last commit (NB unless you did make some!). This should be reflected in your Github Desktop pane. To update the contents of where this repo lives on Github, we still need to Push origin. There is a history tab at the top of the file changes windows, where you can always examine changes to your repo in the past. You can see the staus changes in the picture below, and there are actually 2 buttons for Push Origin - pick one and smash it!

A final step here is go to your Github repository page online and have a look at the changes you have made - your file list should have changed and the new README should reflect your edits. Congratualtions!
3.3.4 Resources
The purpose of this page was really just to introduce you to the ideas of Git, Github and Github Desktop, for those who have not encountered them before. This is just the barest of introductions to these fun, powerful, useful tools. To really become proficient will most likely require quite a bit of practice. We have not covered all the Git and Github specific jargon, or all the functionality of these tools. We also have completely ignored possibly the most powerful way to use Git and Github, which is directly from a Command Line terminal.
Here are a few of our favorite resources if you want to learn more:
Jenny Ryan’s Happy Git and Github book
Video: Creative uses for Github
Video: Comprehensive Github intro (Edureka)
That’s it, now Git.
